Dear Debbie;
Any ideas for Christmas crafty projects with the kids. I like to get them into the spirit of making or personalizing gifts.
— Frannie
Dear Frannie;
Children love projects, especially when working and playing along with mom or dad. It’s a wonderful way to share time with your kids and the results may surprise you … did you know they were that artistic? There are so many ideas, but let’s start with designing wrapping paper.
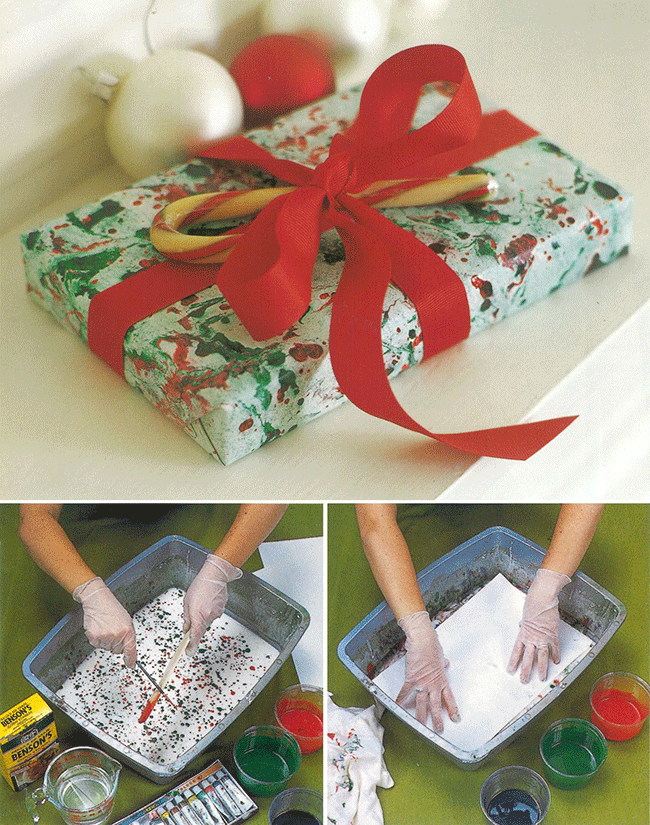
For this recipe you do need oil-based paint, so care must be taken when handling toxic paint thinner. You need a pan large enough to lay out the paper you are decorating. (A plastic kitty litter pan works well.) Begin by making the gel. In a saucepan dissolve 1 ½ cups cornstarch in 1 ½ cups cold water. Add 3 cups water and bring to boil stirring and whisking constantly. When it reaches a boil, take off the heat and pour into pan. Let it sit until it cools and turns into a thick gel, about 15 or 20 minutes. Mix artist’s oil colours with paint thinner so that they are quite runny. Liberally apply the first paint colour to an artist’s brush, then, with a stir stick, tap and splatter the paint over the surface of the gel. Add as many colours as you want. Blend the colours using the wooden end of the paint brush to make designs. Lay the paper flat over the surface, making sure that it is all touching the paint. Lift the paper out carefully and carry it to the sink. Rinse the gel off the paper. The paint will adhere because it’s oil. Hang the paper to dry overnight. Iron flat using a low heat setting. This makes beautiful re-usable wrapping paper, or can be cut out in shapes for tree ornaments.
Kids are always bringing art home from school. Although it’s impossible to keep every last piece, here’s an alternative to sticking them up on the fridge. Make a colourful indoor clothes line for hanging the pictures. Cut lengths of string about four feet long. Colour the string by dunking it into water-based paint, squeezing it out and hang it to dry. Paint wooden clothes pegs, and decorate them with dots or sparkles. Hang the string on a wall, the best height for kids to reach and clip their artwork on with the pegs. This way they can manage their own displays.
Craft and dollar stores have lots of unpainted wooden items including frames, little bird houses, boxes, letters, numbers and ornaments. Why not try some creative finishes to decorate these pieces. Decoupage simplified is the art of cut and paste. Choose a theme, for example, bugs, birds, or geometric shapes. Find small pictures and cut them to fit around a frame. Over a dry, painted frame adhere pictures with decoupage glue. Apply 3 coats of acrylic varnish to seal the pictures and finish the frame.
Dear readers;
I am excited to announce the publication of my new book, DESIGN YOUR NEXT CHAPTER: How to Realize Your Dreams and Reinvent Your Life. Drawing from my own experiences and the uplifting stories shared by others, this inspirational book is for anyone who has ever asked themselves “What is next for me?” Available now in-stores and online – www.amazon.com | www.indigo.ca.


